Implementing Single Sign-On (SSO) with SAML for a Django Application

Introduction
Adding SSO via SAML to a Django application can be a complex process. When I first tackled this task, I wished for a simple, straightforward tutorial. That's why I've created this guide - to help others implement SSO in their Django apps.
This tutorial will guide you through the process of setting up SSO for your Django application, specifically configuring it as a Service Provider (SP) in the SAML framework. As an SP, your Django app will rely on an external Identity Provider (IdP) for user authentication. By the end of this tutorial, your application will be able to delegate the authentication process to the IdP. This means users can log in through the IdP's interface and then access your app without needing separate credentials. Your Django app, as the SP, will trust and accept the authentication assertions provided by the IdP, allowing seamless and secure access for authenticated users.
Glossary
- SSO (Single Sign-On): A user authentication process that allows a user to access multiple applications with one set of login credentials.
- SAML (Security Assertion Markup Language): An XML-based framework for exchanging authentication and authorization information between an Identity Provider (IdP) and a Service Provider (SP).
- IdP (Identity Provider): The system that provides user authentication and passes the identity of the user to the Service Provider.
- SP (Service Provider): The system that relies on the Identity Provider to authenticate users and provide access to services or applications.
- ACS (Assertion Consumer Service): This endpoint on the Service Provider (your Django app) receives and processes SAML assertions sent by the Identity Provider after user authentication. It validates the SAML response and logs the user into the application, granting them access based on the provided authentication details.
- Metadata (sp.xml/idp.xml): XML files that describe the configuration and capabilities of the Identity Provider and Service Provider.
- PySAML2: A Python library used for handling SAML2 operations, providing the underlying functionality for SAML-based authentication.
- django-allauth: A Django package providing user authentication, registration, account management, and third-party (social) account authentication.
- Mako: A templating engine used for rendering HTML in Python applications.
- pytest: A testing framework for Python, used for writing and running tests.
With these terms defined, let's dive into setting up Single Sign-On (SSO) with SAML for your Django application.
There are two popular Django packages for integrating SAML2:
- Django SAML2 Authentication (a fork of
django-saml2-authby Grafana) - djangosaml2 (which did not support newer Django versions in the past, but this has since been fixed)
These packages use PySAML2 for the main SAML functionality. Their main job is to connect PySAML2 with Django. I chose the first package for this tutorial. It works well, but has some drawbacks. It's not great at handling errors or making testing easy. We'll discuss these issues later in the Caveats section.
For those new to SAML or seeking a deeper understanding, these resources provide helpful content on how SAML works in general:
Single Sign On Login Flow
Maybe we start with an overview how the authentication flow will look like with SSO.
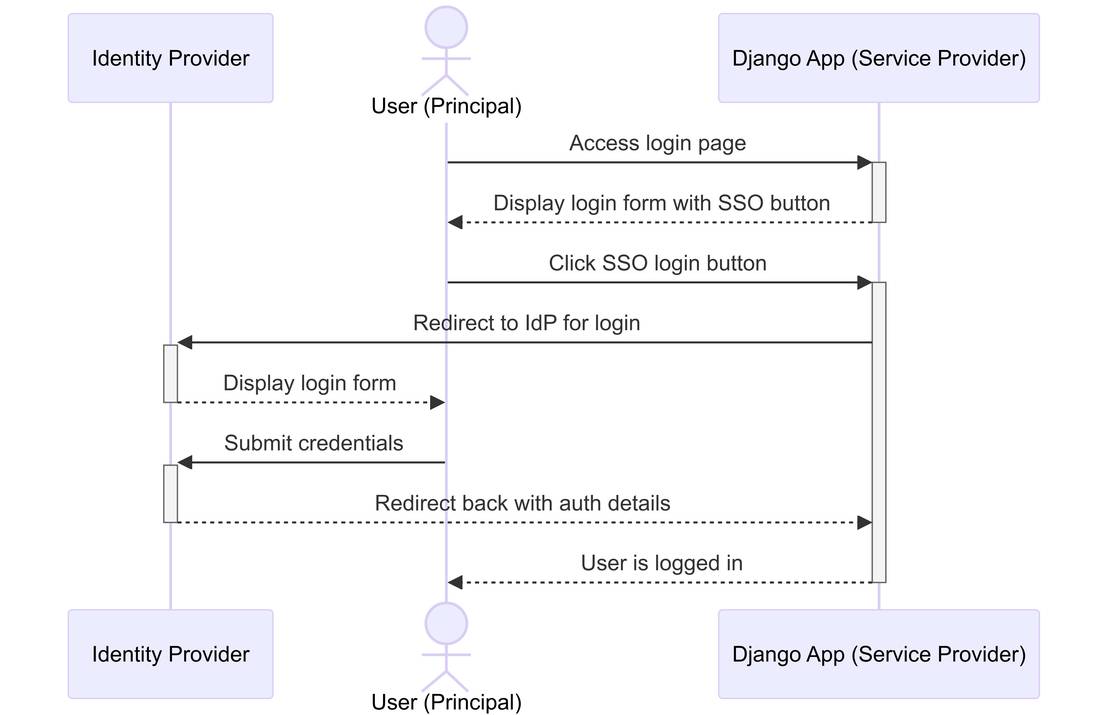
The provided sequence diagram illustrates a typical Single Sign-On (SSO) login flow using Security Assertion Markup Language 2.0 (SAML2) between a User, a Django Application (acting as the Service Provider), and an Identity Provider (IdP). Here's an explanation of each step depicted in the diagram:
- User Accesses Login Page: The user navigates to the login page of the Django application.
- Display Login Form: The Django application displays a login form with an SSO button.
- Click SSO Button: The user clicks the SSO login button.
- Redirect to IdP: The Django application redirects the user to the Identity Provider (IdP) for authentication.
- Display IdP Login Form: The IdP presents a login form for the user.
- Submit Credentials: The user submits their credentials to the IdP.
- Redirect Back with Auth Details: The IdP redirects back to the Django application with authentication details.
- User Logged In: The Django application logs the user in and grants access.
This flow demonstrates how SAML2 enables Single Sign-On. Users authenticate through an Identity Provider, which then sends a SAML response containing the authentication assertion to your Django application. This allows users to access your application without needing to log in separately.
Here's the Mermaid code that created the diagram above.
Setting Up Your Django Application
First, create a directory for your Django application. You can name it however you like, but make sure you are in this directory when copying and pasting commands from this post later on.
mkdir sso_tutorial && cd sso_tutorial
Set up a Python virtual environment in your project directory and install the required packages:
- grafana-django-saml2-auth: This integrates the pysaml2 library with Django.
- django-allauth: This provides login views and an email change view (accessible only to logged-in users).
Please note that this example is currently compatible only with Python versions below 3.13. For more details, see this issue.
python3.12 -m venv venv
source venv/bin/activate
python -m pip install --upgrade pip
python -m pip install Django grafana-django-saml2-auth django-allauth
Set up your Django environment by creating a new project with the `startproject` command. Then, prepare your database by running migrations, and finally launch the development server. These steps will get your basic Django application up and running.
django-admin startproject sso_test .
python manage.py migrate
python manage.py runserver
If you go to http://localhost:8000/, you should see the "The install worked successfully! Congratulations!" Django start page. 🎉
Configure SAML and Allauth
Now we need to configure django-allauth and django-saml2-auth to be included in our INSTALLED_APPS. We also need to add the AccountMiddleware for allauth.
Next, we will configure django-saml2-auth. The following settings are the minimum required to make a simple test work. In a real-life setup, you will likely need to refine these settings. The METADATA_AUTO_CONF_URL specifies the URL where our Service Provider can learn about the Identity Provider configuration. We will generate the idp.xml file later. The ATTRIBUTES_MAP is necessary to map the uid assertion from the Identity Provider to the local Django username. Other settings are kept simple for both the Service Provider and Identity Provider configurations.
# in sso_test/settings.py

INSTALLED_APPS = [
    ...
    'allauth',
    'allauth.account',
    'django_saml2_auth',
]

...

MIDDLEWARE = [
    ...
    'allauth.account.middleware.AccountMiddleware',
]

SAML2_AUTH = {
    'METADATA_AUTO_CONF_URL': 'http://localhost:8088/idp.xml',
    'ENTITY_ID': 'http://localhost:8000/sso/metadata/',
    'ATTRIBUTES_MAP': {
        'username': 'uid',
    },
    'AUTHN_REQUESTS_SIGNED': False,
    'WANT_ASSERTIONS_SIGNED': False,
    'WANT_RESPONSE_SIGNED': False,
    'TOKEN_REQUIRED': False,
    'DEBUG': True,
}
After adding allauth to INSTALLED_APPS, we need to run the migrations again to create the tables required by django-allauth.
source venv/bin/activate
python manage.py migrate
Next, add the allauth URLs to your URL configuration. Then, include the SSO URLs for django-saml2-auth and add the special sign-in view.
# in sso_test/urls.py
from django.urls import path, include

from django_saml2_auth.views import signin

urlpatterns = [
    ...
    path('accounts/', include('allauth.urls')),
    path('sso/', include('django_saml2_auth.urls')),
    path('accounts/sso-login/', signin, name="sso-login"),
]
Check that your server is still running to confirm there are no major issues.
Creating and Configuring the Test Identity Provider
To test our Django application, we need to set up a test Identity Provider (IdP) and generate the necessary metadata files. The sp.xml file describes the configuration of the Service Provider (our Django app) and needs to be provided to the Identity Provider so it knows about the Service Provider. Conversely, the idp.xml file describes the configuration of the Identity Provider and needs to be provided to the Service Provider.
Create the sp.xml Metadata
In this setup:
- We create an
idpsubdirectory within oursso_tutorialproject directory. - We download and use pre-existing key and certificate files for simplicity.
- We update the configuration files to point to the correct paths and ports for our Django application.
- Finally, we generate the
sp.xmlmetadata file.
First, create a subdirectory for the IdP within your main project directory.
mkdir idp && cd idp
Next, download the key and certificate that we will use. While you could generate your own key and certificate using OpenSSL or modify the configuration to omit these files, using the provided files is the easiest way.
mkdir pki
curl -o pki/mycert.pem https://raw.githubusercontent.com/IdentityPython/pysaml2/master/example/idp2/pki/mycert.pem
curl -o pki/mykey.pem https://raw.githubusercontent.com/IdentityPython/pysaml2/master/example/idp2/pki/mykey.pem
Now, fetch the configuration files needed to generate the sp.xml metadata file. Use the following commands to download the example configuration files, update their paths and ports to match our setup, and then generate the metadata file.
curl -o service_conf.py https://raw.githubusercontent.com/IdentityPython/pysaml2/master/example/sp-wsgi/service_conf.py.example
curl -o sp_conf.py https://raw.githubusercontent.com/IdentityPython/pysaml2/master/example/sp-wsgi/sp_conf.py.example
sed -e 's|../idp2/idp.xml|idp.xml|' \
    -e 's|8087|8000|' \
    -e 's|acs/post|sso/acs/|' \
    -e 's|slo/redirect|accounts/sso_logout/|' \
    -e 's|slo/post|accounts/sso_logout/|' \
    -e 's|%ssp.xml" % (BASE, ""),|sso/metadata/" % BASE,|' \
    sp_conf.py > sp_conf.tmp && mv sp_conf.tmp sp_conf.py
curl -o idp.xml https://raw.githubusercontent.com/IdentityPython/pysaml2/master/example/idp2/idp.xml
make_metadata sp_conf.py > sp.xml
The make_metadata command is included in the PySAML2 package and should be available once you’ve activated your virtual environment.
Create the idp.xml Metadata
After generating the sp.xml file needed by our test Identity Provider, we now need to generate the idp.xml metadata required for our Django app (we already configured the idp.xml metadata URL in the SAML2_AUTH settings).
Fetch and Modify Configuration Files
First, we need to download the configuration file for the Identity Provider. We will then make some regex replacements to ensure the configuration fits our project setup: specifically, ensuring the sp.xml file is in the same directory and that we do not use HTTPS for our local testing.
curl -o idp_conf.py https://raw.githubusercontent.com/IdentityPython/pysaml2/master/example/idp2/idp_conf.py.example
sed -e 's|../sp-wsgi/sp.xml|sp.xml|' \
    -e 's|HTTPS = True|HTTPS = False|' \
    idp_conf.py > idp_conf.tmp && mv idp_conf.tmp idp_conf.py
Next, download the necessary scripts for running the Identity Provider:
curl -o idp.py https://raw.githubusercontent.com/IdentityPython/pysaml2/master/example/idp2/idp.py
curl -o idp_user.py https://raw.githubusercontent.com/IdentityPython/pysaml2/master/example/idp2/idp_user.py
Fetch Mako Templates
The Identity Provider uses Mako templates to render the login form. We need to download these templates and place them in the htdocs directory to avoid modifying the configuration.
mkdir htdocs
curl -o htdocs/root.mako https://raw.githubusercontent.com/IdentityPython/pysaml2/master/example/idp2/templates/root.mako
curl -o htdocs/login.mako https://raw.githubusercontent.com/IdentityPython/pysaml2/master/example/idp2/htdocs/login.mako
Install Dependencies
Install the necessary dependencies for running the test Identity Provider, specifically cherrypy and mako.
python -m pip install cherrypy mako
Generate the idp.xml Metadata File and Run the Test Identity Provider
Now, we can generate the idp.xml metadata file and run the test Identity Provider.
make_metadata idp_conf.py > idp.xml
python idp.py idp_conf
You should now be able to access the metadata file URL we configured for Django (http://localhost:8088/idp.xml).
Adding SSO Link to the Login Form
First, we need to copy the login template from django-allauth.
# First, navigate back to your main project directory (sso_tutorial)
mkdir -p templates/account/
cp venv/lib/*/site-packages/allauth/templates/account/login.html templates/account/
Next, configure the templates directory to be used by the DjangoTemplates backend.
# sso_test/settings.py
TEMPLATES = [
    {
        ...
        'DIRS': ['templates'],
        ...
    }
]
If you now go to the django-allauth login page, you should see the default login form which might look a bit raw because there's no CSS applied yet, but that's okay.
Add an SSO Login Link
Now we'll add an SSO-Login link to the login form that will redirect us to the login form of our test Identity Provider.
Edit the login.html template to include the SSO-Login link:
# edit templates/account/login.html
...
{% element button type="submit" tags="prominent,login" %}
    {% trans "Sign In" %}
{% endelement %}
 <button>
   <a href="{% url 'sso-login' %}?next=/accounts/email/">SSO-Login</a>
 </button>
...
Now, if you go to the login page and click the SSO-Login link, you will be redirected to the test Identity Provider's login form. Enter the username "testuser" and password "qwerty", and you should be redirected to the email change template, which is only accessible if you are successfully authenticated. Congratulations!
Testing the SSO Flow
Now that we have our SSO-Login flow working, we should make sure it functions as expected by writing tests. To do this, we'll use pytest and pytest-django.
First, install pytest and pytest-django, create a tests directory, add an __init__.py file to it, and create a pytest.ini file to configure pytest-django with our Django settings.
source venv/bin/activate
python -m pip install pytest pytest-django
mkdir tests
touch tests/__init__.py
printf "[pytest]\nDJANGO_SETTINGS_MODULE = sso_test.settings\nfilterwarnings =\n    ignore:datetime.datetime.utcnow.*is deprecated and scheduled for removal in a future version:DeprecationWarning\n    ignore:The SAML service provider accepts unsigned SAML Responses and Assertions.*:UserWarning\n" > pytest.ini
Next, create a basic test in the tests directory:
# tests/sso_test.py

def test_sso_signin():
    assert False
Run pytest to ensure the test is found and reported as failing. After verifying this, we can write a proper pytest-based test to automate the SSO sign-in flow we tested manually.
After fetching the full test from GitHub, it should now pass. If you test against a real-world Identity Provider, you can easily grab one of the encoded SAML responses you receive and replace the SAML response in our example with the real one. This ensures that your authentication flow works correctly as long as the SAML responses you receive remain sufficiently similar.
# Download the complete test code
curl -o tests/sso_test.py https://gist.githubusercontent.com/ephes/aecc9aeed0688bc09c86703b9a29f89c/raw/ec6252e165585ff8bdf09af66732fe2ffbc1917e/sso_test.py

# Run the test again; it should now pass
pytest
Explanation of the Test Code
First, we define a fixture idp_metadata_path that creates a minimalistic IdP metadata configuration shared across all tests. While it would be more convenient to provide an inline IdP metadata configuration directly, this feature isn't supported yet. This fixture ensures a consistent setup for any test requiring IdP metadata. The SamlResponse class encapsulates the bulk of the setup for creating an encoded SAML response that will be posted to the ACS endpoint, keeping the actual test code simple and easy to understand.
@pytest.fixture(scope="session")
def idp_metadata_path(tmp_path_factory):
    fn = tmp_path_factory.mktemp("data") / "idp.xml"
    with fn.open("w") as f:
        f.write('<EntityDescriptor entityID="https://localhost:8088/idp.xml" />')
    return fn
Within the SamlResponse class, several key properties and methods are defined. The identity_provider property sets up the Identity Provider configuration using a minimalistic Service Provider (SP) metadata configuration. The create_authn_response method utilizes this Identity Provider configuration to generate a base64 encoded SAML response, mimicking what the Service Provider (our Django app) would receive from a real IdP. The modify_saml2_auth_settings method adjusts the Django settings to use the generated IdP metadata and the correct entity ID for the test environment.
...
    @property
    def identity_provider(self):
        sp_metadata = SP_XML_TEMPLATE.format(test_host=self.test_host, entity_id=self.entity_id)
        config_data = {
            "entityid": "https://localhost:8088/idp.xml",
            "service": {"idp": {}},
            "metadata": {"inline": [sp_metadata]},
        }
        config = PysamlConfig().load(config_data)
        idp = server.Server(config=config)
        idp.ticket = {}
        return idp

    def create_authn_response(self, user_identity):
        resp_args = {
            "in_response_to": "id-some-id",
            "sp_entity_id": self.entity_id,
            "name_id_policy": None,
            "binding": "urn:oasis:names:tc:SAML:2.0:bindings:HTTP-POST",
            "destination": self.acs_url,
            "authn": {"authn_auth": "http://www.example.com/authn"},
        }
        response = self.identity_provider.create_authn_response(user_identity, **resp_args)
        encoded_response = base64.b64encode(str(response).encode("utf-8"))
        return encoded_response

    def modify_saml2_auth_settings(self, settings):
        settings.SAML2_AUTH["ENTITY_ID"] = self.entity_id
        settings.SAML2_AUTH["METADATA_LOCAL_FILE_PATH"] = self.idp_metadata_path
        settings.SAML2_AUTH["DEFAULT_NEXT_URL"] = self.next_url
        del settings.SAML2_AUTH["METADATA_AUTO_CONF_URL"]
...
The test_sso_signin function contains the core test logic. It begins by creating an instance of SamlResponse with a test username and the IdP metadata path. The function then modifies the SAML settings in Django to use the test entity ID and metadata. Next, it generates an encoded SAML response with the test user's identity information and posts this response to the ACS URL.
@pytest.mark.django_db
def test_sso_signin(client, settings, idp_metadata_path, django_user_model):
    # Given a SAML response with a username and an identity provider metadata file
    username = "testuser"
    saml_response = SamlResponse(username, idp_metadata_path)

    # And the SAML2_AUTH settings are modified to use the SAML response's entity ID
    saml_response.modify_saml2_auth_settings(settings)

    # When the encoded SAML response is posted to the ACS URL
    user_identity = {"uid": saml_response.username}
    encoded_response = saml_response.create_authn_response(user_identity)
    r = client.post(saml_response.acs_url, data={"SAMLResponse": [encoded_response]})

    # Then the response is a redirect pointing to the DEFAULT_NEXT_URL
    assert r.status_code == 302
    assert r.url == saml_response.next_url

    # And a user with the SAML response's username is created and can only authenticate via SSO
    sso_user = django_user_model.objects.get(username=username)
    assert sso_user.has_usable_password() is False
The test asserts that the server's response is a redirect to the default next URL, indicating a successful SSO login. Additionally, it verifies that a user with the provided username has been created in the Django database and that this user can only authenticate via SSO (i.e., they do not have a usable password).
Advanced Configurations and Caveats
Implementing SSO involves several advanced configurations and considerations that go beyond the scope of this already lengthy blog post. In this section, I will provide a brief overview of these topics. Stay tuned for future blog posts where I will explore these aspects in greater detail.
Validating the Assertions
When we, as a Service Provider, receive a SAML response from the Identity Provider, we usually get more than just the user ID. Often, we also receive additional attributes that we might want to use, such as information about permissions a user has or other attributes that we want to store in a user profile.
Just like any other input we receive from outside, these attributes need to be validated before being written to the database. In Django, the central mechanism for validating user input is through forms. Therefore, we can treat the assertions we receive from an IdP as form data and validate them using Django forms. By treating SAML assertions as form data, we leverage Django's robust validation framework, ensuring that any data we write to our database is clean and well-formed. This method provides a clear structure for handling errors and maintaining data integrity.
Additionally, only users associated with a configured IdP can log in to our Django app, preventing access from unauthorized IdPs. For security, ensure HTTPS is activated for all requests if the assertions are not signed. If HTTPS is not used, it is crucial to have the assertions signed to protect the integrity and authenticity of the transmitted data.
Multiple Identity Providers
If your users need to log in using different Identity Providers (IdPs), you’ll need a way to store various configurations in your database. One approach is to use a SAML configuration model in Django to store the configuration details for each specific IdP. Storing the configuration in the database also allows you to dynamically add or remove identity providers without changing the Django settings, which would typically require an application deployment.
Determining the Right Configuration
IdP-Initiated Flows
For IdP-initiated flows, determining which configuration to use is straightforward. Since the IdP initiates the login, it's clear which configuration applies. When a new user is created during this process, they can be associated with the correct configuration at the time of their creation.
SP-Initiated Flows
In a Service Provider (SP)-initiated flow, if you want to use an IdP configuration linked to a user, the user must already exist. However, you can work around this limitation by storing the ID of the desired IdP configuration in the session before the user is created. This is possible because, in Django, user sessions can exist independently of user accounts. When the user is eventually created, you can then associate them with the IdP configuration that was stored in the session.
Preprocessing the SAML Response
Sometimes, SAML responses from IdPs can have unusual formats, invalid signatures, or missing essential information. To handle such issues, you can wrap the ACS endpoint and preprocess the SAML response XML before forwarding it to the "real" ACS endpoint. If you already have a configuration model for each IdP, you can implement custom XML sanitation logic tailored to each IdP's specific requirements.
Caveats
Helpful Error Messages
I have found that the error messages generated by django-saml2-auth are often misleading. The ACS endpoint has a default exception handler that returns a generic internal server error, regardless of the specific exception raised by pysaml2. This can lead to confusion, as even an invalid signature on a SAML response will trigger a message from our Django app that essentially says, "Sorry, we messed up."
To address this, I needed to call the original undecorated ACS view and implement my own exception handling. Here's an example of how to do this (link to related GitHub issue):
try:
    # Call the original ACS view without the exception_handler decorator
    response = saml_views.acs.__wrapped__.__wrapped__(request)
except Exception as exc:
    response = handle_exception(exc, request, config)
Making Tests Easier
Testing login flows with different combinations of IdP and SP configurations, along with various SAML responses, took quite some time to figure out. A major breakthrough was discovering that you can provide the Service Provider metadata configuration for a test IdP using pysaml2 with Python dictionaries, like this:
from saml2 import server
from saml2.config import Config as PysamlConfig

config_data = {
    "entityid": "https://localhost:8088/idp.xml",
    "service": {"idp": {}},
    "metadata": {"inline": [sp_metadata]},
}
config = PysamlConfig().load(config_data)
idp = server.Server(config=config)
Unfortunately, providing the IdP metadata in the same manner isn't possible with django-saml2-auth, as it only supports setting a METADATA_LOCAL_FILE_PATH or a METADATA_AUTO_CONF_URL. There is also a GitHub issue discussing this limitation.
Conclusion
Implementing Single Sign-On (SSO) with SAML for your Django application enhances user experience by allowing seamless authentication across multiple services. This tutorial provided a step-by-step guide to setting up SSO, from initial setup and configuration to testing and handling advanced scenarios.
By following these steps, you should have a working SSO setup for your Django application, enabling users to authenticate through an external Identity Provider.
If you have any questions or comments, feel free to write me an email. Happy coding!