Implementing Single Sign-On (SSO) with SAML for a Django Application

Introduction
Adding SSO via SAML to a Django application can be a complex process. When I first tackled this task, I wished for a simple, straightforward tutorial. That's why I've created this guide - to help others implement SSO in their Django apps.
This tutorial will guide you through the process of setting up SSO for your Django application, specifically configuring it as a Service Provider (SP) in the SAML framework. As an SP, your Django app will rely on an external Identity Provider (IdP) for user authentication. By the end of this tutorial, your application will be able to delegate the authentication process to the IdP. This means users can log in through the IdP's interface and then access your app without needing separate credentials. Your Django app, as the SP, will trust and accept the authentication assertions provided by the IdP, allowing seamless and secure access for authenticated users.
Glossary
- SSO (Single Sign-On): A user authentication process that allows a user to access multiple applications with one set of login credentials.
- SAML (Security Assertion Markup Language): An XML-based framework for exchanging authentication and authorization information between an Identity Provider (IdP) and a Service Provider (SP).
- IdP (Identity Provider): The system that provides user authentication and passes the identity of the user to the Service Provider.
- SP (Service Provider): The system that relies on the Identity Provider to authenticate users and provide access to services or applications.
- ACS (Assertion Consumer Service): This endpoint on the Service Provider (your Django app) receives and processes SAML assertions sent by the Identity Provider after user authentication. It validates the SAML response and logs the user into the application, granting them access based on the provided authentication details.
- Metadata (sp.xml/idp.xml): XML files that describe the configuration and capabilities of the Identity Provider and Service Provider.
- PySAML2: A Python library used for handling SAML2 operations, providing the underlying functionality for SAML-based authentication.
- django-allauth: A Django package providing user authentication, registration, account management, and third-party (social) account authentication.
- Mako: A templating engine used for rendering HTML in Python applications.
- pytest: A testing framework for Python, used for writing and running tests.
With these terms defined, let's dive into setting up Single Sign-On (SSO) with SAML for your Django application.
There are two popular Django packages for integrating SAML2:
- Django SAML2 Authentication (a fork of
django-saml2-authby Grafana) - djangosaml2 (which did not support newer Django versions in the past, but this has since been fixed)
These packages use PySAML2 for the main SAML functionality. Their main job is to connect PySAML2 with Django. I chose the first package for this tutorial. It works well, but has some drawbacks. It's not great at handling errors or making testing easy. We'll discuss these issues later in the Caveats section.
For those new to SAML or seeking a deeper understanding, these resources provide helpful content on how SAML works in general:
Single Sign On Login Flow
Maybe we start with an overview how the authentication flow will look like with SSO.
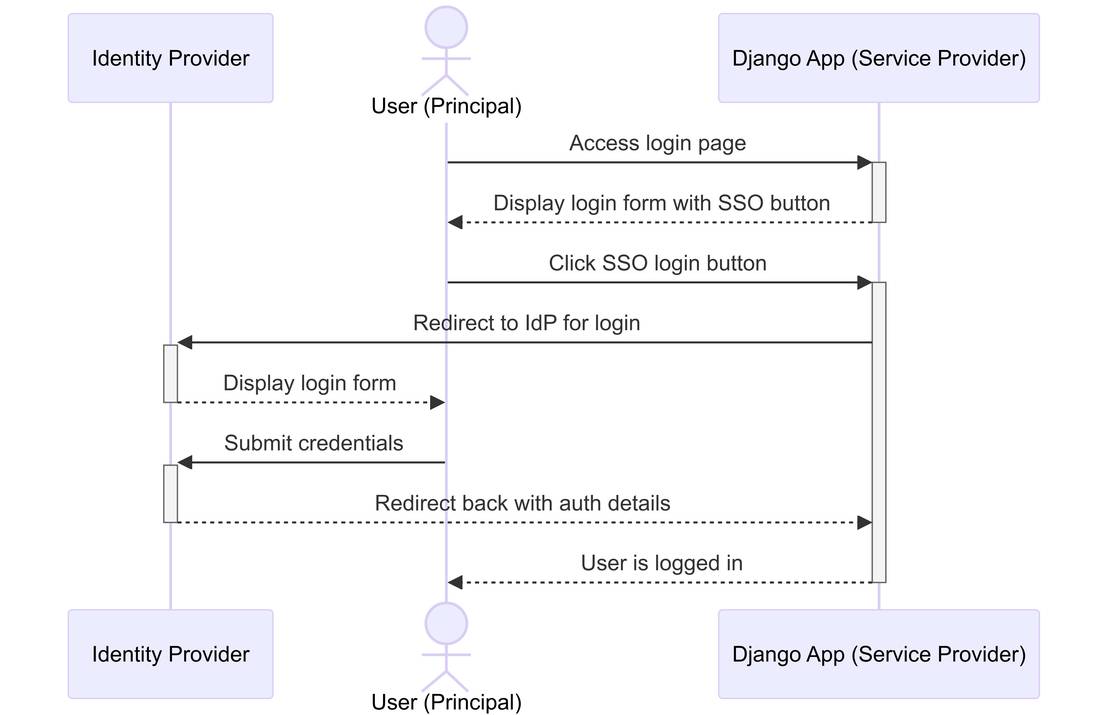
The provided sequence diagram illustrates a typical Single Sign-On (SSO) login flow using Security Assertion Markup Language 2.0 (SAML2) between a User, a Django Application (acting as the Service Provider), and an Identity Provider (IdP). Here's an explanation of each step depicted in the diagram:
- User Accesses Login Page: The user navigates to the login page of the Django application.
- Display Login Form: The Django application displays a login form with an SSO button.
- Click SSO Button: The user clicks the SSO login button.
- Redirect to IdP: The Django application redirects the user to the Identity Provider (IdP) for authentication.
- Display IdP Login Form: The IdP presents a login form for the user.
- Submit Credentials: The user submits their credentials to the IdP.
- Redirect Back with Auth Details: The IdP redirects back to the Django application with authentication details.
- User Logged In: The Django application logs the user in and grants access.
This flow demonstrates how SAML2 enables Single Sign-On. Users authenticate through an Identity Provider, which then sends a SAML response containing the authentication assertion to your Django application. This allows users to access your application without needing to log in separately.
Here's the Mermaid code that created the diagram above.